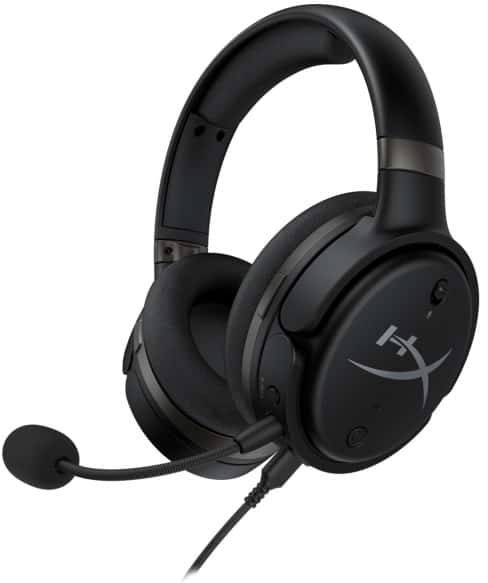
HyperX Cloud Orbit Gaming Headset User Manual : In this user manual, we will explore the manual of HyperX Cloud Orbit Gaming Headset.
HyperX Cloud Orbit Gaming Headset User Manual
Specifications
Driver: Planar transducer, 100 mm
Type: Circumaural, Closed back
Frequency response: 10Hz–50,000Hz
Sound pressure level: >120 dB
T.H.D: < 0.1% (1 kHz, 1 mW)
Weight: 368g
Modes:
- Orbit: 3D audio
- Orbit S: 3D audio with head tracking
Cable length:
- USB Type-C to USB Type-A: 3m
- USB Type-C to USB Type-C: 1.5m
- 3.5mm plug (4-pole): 1.2m
Microphone
- Element: Electret condenser microphone
- Polar pattern: Uni-directional
Battery life
- Analog 3.5mm mode: 10 hours
- *Tested at 50% headphone volume
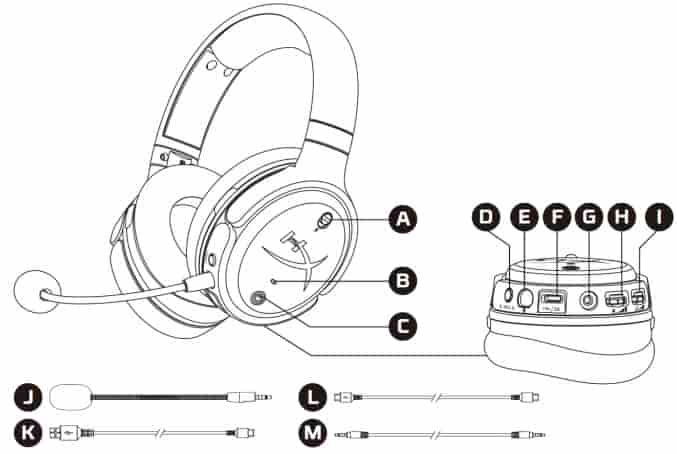
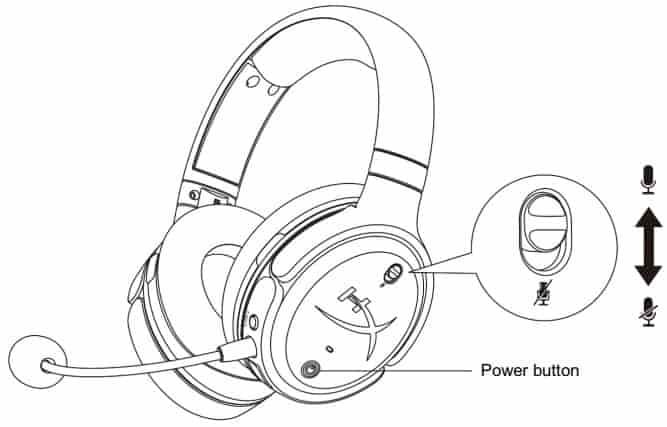
Overview
A. Microphone mute
B. Status LED
C. Power button
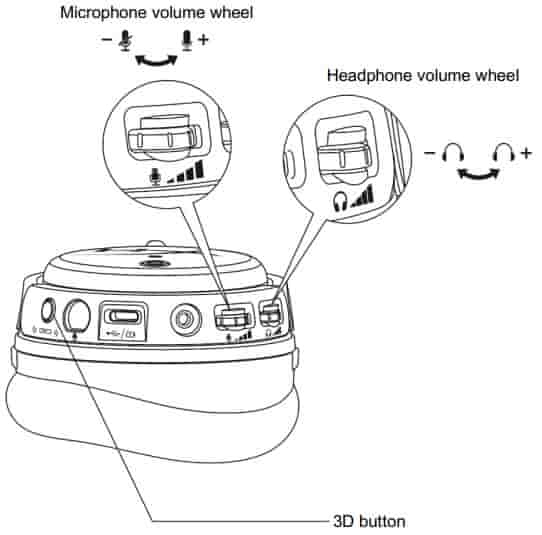
D. 3D button
E. Microphone port
F. USB Type-C port
G. 3.5mm port
H. Microphone volume wheel
I. Headphone volume wheel
J. Detachable boom microphone
K. USB Type-C to USB Type-A cable
L. USB Type-C to USB Type-C cable
M. 3.5mm cable (4-pole)
Using the Headset
USB Mode
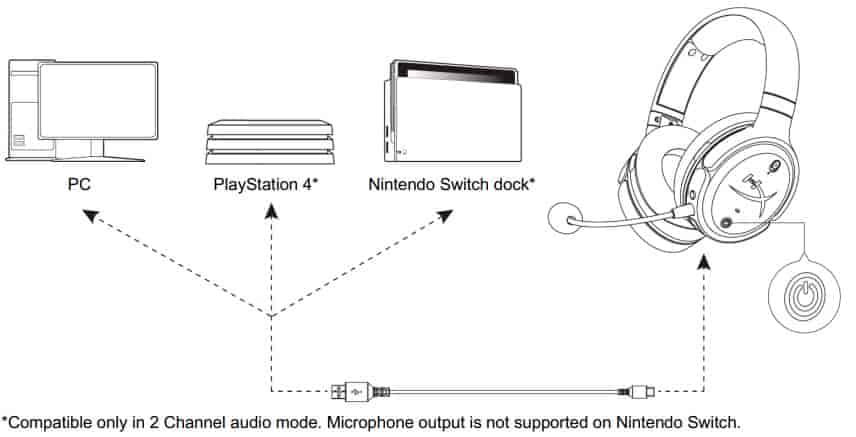
PC USB Setup
- Power on the headset.
- Connect the headset to the PC with the USB Type-C to USB Type-A cable.
- Right click speaker icon > Select Open Sound settings > Select Sound control panel.
- Under Playback tab, click on “HyperX Cloud Orbit” / “HyperX Cloud Orbit S” and click on Set Default.
- Under Recording tab, click on “HyperX Cloud Orbit” / “HyperX Cloud Orbit S” and click on Set Default.
PlayStation 4 USB Setup
- Power on the headset.
- Hold down the microphone volume wheel for 2 seconds to change audio.modes. Repeat this step until the headset plays the voice prompt “2 Channel”.
- Connect the headset to the PlayStation 4 console with the USB Type-C to USB Type-A cable.
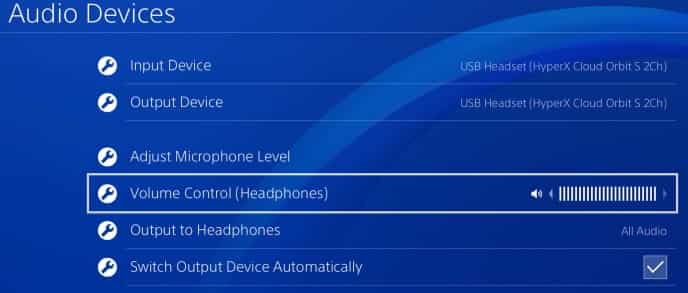
- From the PS4 main menu, go to Settings > Devices > Audio Devices.
- Set Input Device to USB Headset (HyperX Cloud Orbit 2Ch) or USB Headset (HyperX Cloud Orbit S 2Ch).
- Set Output Device to USB Headset (HyperX Cloud Orbit 2Ch) or USB Headset (HyperX Cloud Orbit S 2Ch).
- Set Output to Headphones to All Audio.
- Set Volume Control (Headphones) to maximum.
Nintendo Switch USB Setup
- Power on the headset.
- Hold down the microphone volume wheel for 2 seconds to change audio modes. Repeat this
step until the headset plays the voice prompt “2 Channel”. - Connect the headset to the Nintendo Switch dock via the USB Type-C to Type-A cable.
- Hold the HOME button on the controller for 1 second to access the Quick Settings menu.
- Go to the USB volume control and set the level to maximum.
Analog 3.5mm Mode
- Power on the headset.
- Connect the headset to the device’s 3.5mm port with the 3.5mm (4-pole) cable.

Controls
| Button/Control | Action | Function |
| Power button | Hold down for 3 seconds Hold down for 5 seconds Press once | Power on headset Power off headset Play/pause audio |
| Microphone mute | Move switch up Move switch down | Disable microphone mute Enable microphone mute |
| Button/Control | Action | Function |
| Microphone volume wheel | Scroll Short press and scroll Hold down for 2 seconds | Adjust microphone volume level Change EQ preset Change audio mode |
| Headphone volume wheel | Scroll Short press and scroll Hold down for 2 seconds | Adjust headphone volume level Change to next/previous track Disable USB charging |
| 3D button | Press once Double press Hold down for 2 seconds | Set new center point Select input mode (USB and analog) Change 3D mode |
USB Audio Modes
While the headset is connected to a device via USB, hold down the microphone volume wheel for 2 seconds to change the USB audio mode. A voice prompt will tell you which mode the headset is using.
| Audio Mode | Description |
| 7.1 Channel | The default mode that’s best used for immersive surround sound content like gaming or movies. The headset will appear as an 8 channel sound device. |
| 2 Channel | The mode for devices that only support non Hi-Res stereo output such as PlayStation 4 or Nintendo Switch. The headset will appear as a 2 channel sound device. |
| Hi-Res | The mode that’s best for listening to High-Resolution audio content with the maximum audio fidelity possible. 3D modes are not available when using Hi Res. The headset will appear as a 2 channel sound device. |
3D Modes
Hold down the 3D button for 2 seconds to change the 3D mode. A voice prompt will tell you which 3D mode the headset is using.
| 3D Mode | Description |
| 3D Manual* | 3D audio and head tracking are enabled. This mode is best used when sitting down and looking at a stationary display, such as when you’re playing on a PC or console. Press the 3D button once to set a new center point manually. |
| 3D Automatic* | 3D audio and head tracking are enabled. Center point is set automatically as you move your head. This mode is best used when your head may move often, such as when you’re on the go. Press the 3D button once to set a new center point manually. |
| 3D On | 3D audio is enabled. Head tracking is disabled. |
| 3D Off | 3D audio is disabled. |
EQ Presets
Short press and scroll the microphone volume wheel up or down to change the EQ preset. A voice prompt will tell you which EQ preset the headset is using.
| EQ Preset | Description |
| Default | Tuned to the Audeze House curve. |
| Foot Steps | Enhances sounds of foot steps. |
| Ballistics | Enhances gunshots and other ballistic sounds in FPS games. |
| Music | Optimized for listening to music. |
| Racing | Optimized for racing games. |
| RPG | Optimized for RPGs and immersive games. |
| Warm | Treble is cut and bass is boosted slightly. |
| Flat | No EQ applied. |
Charging the Headset
When the charge cable is connected the LED will indicate the status.
| Status LED | Headset Status |
| LED solid red | Charging |
| LED off | Fully charged |
“Battery low” voice prompt plays at 15% battery.
To disable USB charging, hold down the headphone volume wheel for 2 seconds.
Source
- www.hyperxgaming.com
- Download User Manual – Download
- Product Page – Click Here
Read More