If you are searching for Poly Voyager Focus 2 Bluetooth Headset User Manual then this is your right place.
Poly Voyager Focus 2 Bluetooth Headset User Manual
SPECIFICATIONS
CONNECTS TO
- Voyager Focus 2 UC: PC via included BT700 Bluetooth adapter or via USB cable; smartphone via Bluetooth
- Voyager Office base*: PC via included USB-A or USB-C cable, desk phone via included cable.
RECOMMENDED FOR
- Voyager Focus 2 UC: Professionals on calls all day in noisy home or office environments
- Voyager Office base*: Professionals that want to connect their Voyager Focus 2 or Voyager 4300 UC Series headset to a desk phone.
Wireless
- Bluetooth v5.1
- Class 1
- Multipoint connectivity, headset connects to two devices at the same time, remembers up to 8 devices
- Supported Bluetooth profiles
– A2DP, AVRCP, HSP, HFP
- Range
– Voyager Focus 2 UC: up to 50 m/164 ft
– Voyager Office base: up to 91 m/300 ft
WIRED
- Connect to PC via included micro USB cable with audio over USB mode
BATTERY
- Battery Capacity: 560mAh
- Battery Type: lithium ion
- Talk time:
– Up to 25 hours (ANC and online indicator off)**
– Up to 20 hours (ANC on and online indicator off)**
– Up to 18 hours (ANC off and online indicator on, default setting)
– Up to 16 hours (ANC on and online indicator on, default setting)
- Listening Time:
– Up to 40 hours (ANC off)
– Up to 24 hours (ANC on)
- Charge time: 2 hours for a full charge
- Standby time: up to 30 days
RECEIVE FREQUENCY RESPONSE
- Dynamic EQ optimized for PC wideband voice telephony up to 7 kHz or for multimedia 20 Hz to 20 kHz
ANC TECHNOLOGY
- Digital Hybrid ANC using two digital MEMS microphones and 2 analog ECM microphones with three user settings (Off/low/high)
SMART SENSORS
- Answer calls by simply putting on the headset, mute by taking the headset off and pause/resume music
HEARING PROTECTION
- SoundGuard DIGITAL: G616 support limits the level to 102 dBSPL; Timeweighted average prevents average daily noise exposure from exceeding 85dBA***
MICROPHONE AND TECHNOLOGY
- Discrete noise canceling boom with Acoustic Fence technology to Microsoft Teams Open Office Premium microphone
- Smart discrete microphone boom: wear on either side and maintain location of R/L stereo. Rotate boom up to mute and down to unmute
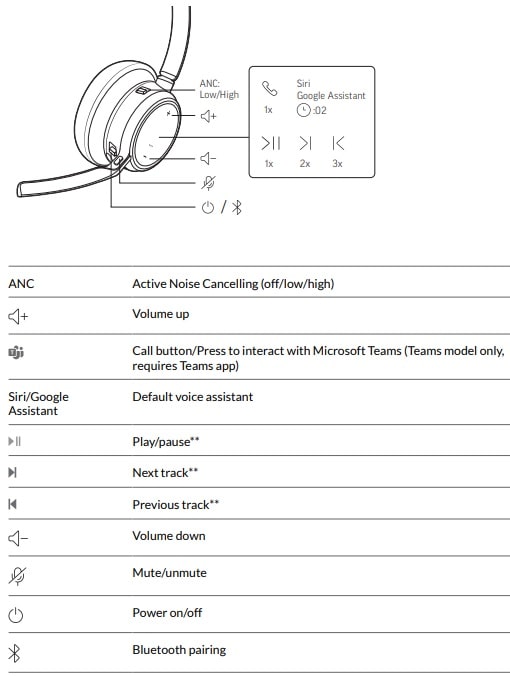
HEADSET CONTROLS AND LIGHTS
- Call answer/end, mute, volume +/-, power on/off/pairing, ANC: Off, low, high
- Online Indicator – Two LED indicators on speaker housing shows in a call status
HEADSET BASE CONTROLS
- Voyager Focus 2 UC with Charge Stand: Desk charger only
- Voyager Office base*: Desk phone, softphone selector button; Microsoft Teams button (Microsoft Teams version only); and desk phone configuration, transmit and receive adjustment
HEADSET WEIGHT
- 175 g/.38 lbs
ACCESSORIES (INCLUDED)
- Voyager Focus 2 UC: Carry case, BT700 USB adapter and charging cable
- Voyager Focus 2 UC with Charge Stand: Carry Case, BT700 USB adapter, charging cable and charging base
- Voyager Office base*: USB-A, USB-C cable, telephone interface cable, power supply
MANAGEABILITY
- Cloud: Poly Lens service
- Local (Windows/Mac): Poly Lens Desktop App (some solutions sold separately)
CERTIFICATION
- Microsoft Teams (Teams version only)
WARRANTY
• 2-year limited warranty included
*Voyager Office Base is available as an accessory and is sold separately. Also compatible with Voyager 4300 UC Series headsets.
**Online indicator adjustments require a setting change via Poly Lens or Plantronics Hub.
***Requires Poly Lens Desktop App to enable SoundGuard DIGITAL features.
LEARN MORE
For more information on Voyager Focus 2, please visit poly.com/voyager-focus-2
For more information on the Voyager Office base visit poly.com/voyager-office-base
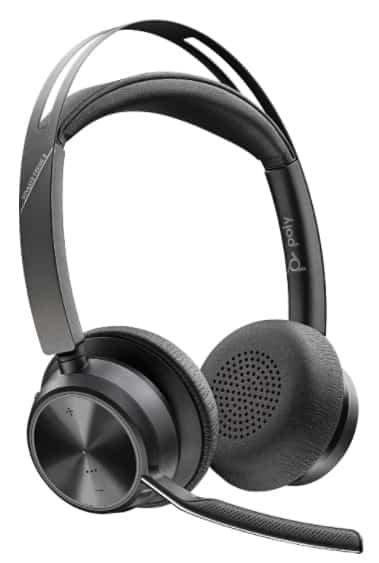
Overview
Headset
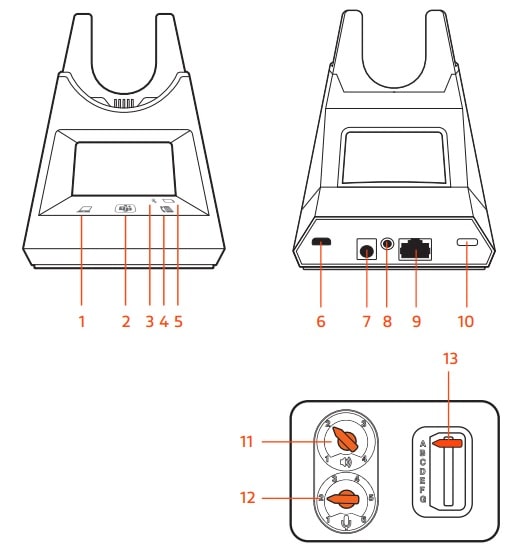
Base overview
- Computer button
- Microsoft Teams button (Teams model only)
- Bluetooth LED
- Desk phone button
- Charging LED
- USB port
- Power jack
- Handset lifter jack
- Telephone interface cable jack
- Bluetooth pairing button
- Desk phone listening volume
- Desk phone speaking volume
- Desk phone configuration switch
Accessories
- Electronic hookswitch cable (EHS cable): Electronically and automatically answers/ends a desk phone call. Enables remote call control with your headset.
- HL10 lifter: Automatically lifts handset and returns it to the cradle. Enables remote call control with your headset.
Hook up system
Using the diagram, connect your headset system.
| Desk phone | Setting (on bottom of base) |
| Most phones | A |
| Cisco phones | D |
| Cisco phones with EHS cable | A |
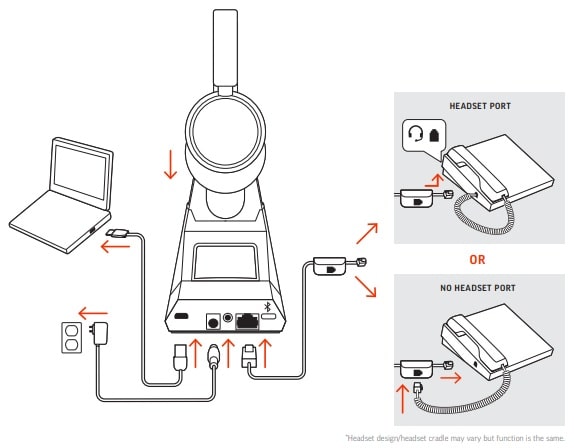
Note: Base configuration settings.
Desk phone setup Details
Choose a desk phone setup A, B, C or D and connect cables.
A: Desk phone with dedicated headset port
- Connect one end of the telephone interface cable to the back of the base
- Connect the other end of the telephone interface cable into the dedicated headset
port on the desk phone
IMPORTANT Cisco phones use configuration D on the bottom of the base. Most other phones use default configuration A.
NOTE Use this setup if you are not using the HL10 lifter or EHS cable. In this configuration, press both the headset button on your desk phone and the call control button on the headset to answer or end calls.
B: Desk phone (standard)
- Connect one end of the telephone interface cable to the back of the base
- Disconnect the handset coil cord from the base of the desk phone and re-connect it tothe telephone interface cable junction box
- Finally connect the remaining end of the telephone interface cable into the openhandset port on the desk phone
IMPORTANT Cisco phones use configuration D on the bottom of the base. Most other phones use default configuration A.
NOTE Use this setup if you are not using the HL10 lifter or EHS cable and your desk phone does not have a dedicated headset port. In this configuration, manually remove the handset on your desk phone and press the call control button on the headset to answer or end calls.
C. Desk phone + EHS cable (sold separately)
IMPORTANT Use configuration A on the bottom of the base, which works for most phones including Cisco phones.
D. Desk phone + HL10 lifter (sold separately)
IMPORTANT Cisco phones use configuration D on the bottom of the base. Most other phones use default configuration A.
Position Your Base
The minimum recommended separation between your desk phone and the base is 6 inches.
The minimum recommended separation between the base and computer is 12 inches. Incorrect position can cause noise and interference problems.
NOTE Headset cradle may vary, but function is the same.
Pair
Pair again to base
Pair mode
Your headset comes pre-paired to the base. To pair again:
- Put your base into pair mode by pressing and holding the Bluetooth pairing
button on the back of your base for 2 seconds until the display panel’s Bluetooth
icon flashes blue and red.
- Pairing is successful when you hear “pairing successful” and “base connected” and the display panel’s Bluetooth
icon turns solid blue.
NOTE Your headset can pair with up to 8 devices but only maintain 2 connections
simultaneously; this includes the base.
Pair to mobile device
1: To put your headset in pair mode, slide and hold the Power switch away from the off position until you hear “pairing” and the headset LEDs flash red and blue.
2: Activate Bluetooth on your phone and set it to search for new devices.
• iPhone Settings > Bluetooth > On*
• Android Settings > Bluetooth: On > Scan for devices*
NOTE *Menus may vary by device.
3: Select “ Poly VFOCUS2 Series.”
If necessary, enter four zeros (0000) for the passcode or accept the connection.
Once successfully paired, you hear “pairing successful” and the headset LEDs stop flashing.
NOTE Your headset can pair with up to 8 devices but only maintain 2 connections
simultaneously; this includes the base.
Pair mode
Slide and hold the headset Power switch away from the off position until the LEDs flash red and blue.
Fit and charge
Wear on the right or left
- To position the microphone on the right or left side, rotate the microphone boom up and over. Bend the boom so it is approximately 2 finger widths from the corner of your mouth.
NOTE: Your headset senses when you change the microphone boom from one side to the other.
- Gently flex the headband wider if the fit is uncomfortable on your ears.
Charge
Charge your headset by placing it in the base’s cradle or by using a micro USB cable. The headset LEDs flash when charging. It takes approximately 2 hours to fully charge your headset. The LEDs turn off once charging is complete.
NOTE: The micro USB cable plugs into a computer or wall charger’s USB port.
Check your headset battery status:
- With headset inactive, slide and release the Power switch away from the off position. Listen to the voice alert or observe the headset LEDs.
Load software
Customize your device behavior through advanced settings and options with Poly Lens App. Some softphones require the installation of Poly software to enable device call control (answer/end and mute) functionality. Download: poly.com/lens.
NOTE: Device settings are also available in Plantronics Hub App.
Update firmware Keep your firmware up-to-date to improve performance and add new features to your Poly device.
Update your firmware using your computer with Poly Lens App. Download at poly.com/ lens.
Update firmware
Keep your firmware up-to-date to improve performance and add new features to your Poly device.
Update your firmware using your computer with Poly Lens App. Download at poly.com/ lens.
While updating firmware:
- Do not use your Poly device until the update is complete.
- Disconnect your Poly device from paired devices such as phones, tablets and computers.
- Do not start a second update from a second device.
- Do not stream media.
- Do not answer or place a call.
The Basics
Power on/off
Slide the switch to power on or off.
Adjust volume
- Headset volume Fine-tune your headset volume by adjusting the headset’s volume up (+) and down (-) controls.
- Desk phone volume When you are on a desk phone call and your voice is too quiet/loud, adjust the speaking volume on the bottom of the base. If your caller’s voice is too loud/ quiet on a desk phone call, adjust the listening volume.
- Base ringtone volume Adjust the base ringtone volume setting in Poly Lens Desktop App. This ringtone alerts you if you are not wearing your headset and a call comes in.
Adjust headset microphone volume (softphone)
Place a test softphone call and adjust softphone volume and PC sound volume accordingly.
Make, answer, end calls
On the front of the base there are 2 Audio buttons: computer and desk phone. These buttons allow you to switch to a different phone line/audio channel.
Make a call (computer or desk phone)
- Tap an Audio button on your base display. You hear a dial tone. Desk phone only: Press the phone’s Headset button or manually remove the handset if you don’t have an HL10 lifter or EHS cable.
TIP If you do not hear a dial tone, turn over the base and adjust the switch (A–G). “A” works for the majority of desk phones. “D” works for Cisco phones.
2. Dial from your softphone or desk phone.
Answer or end a call
To answer or end a call, choose:
- Tap the headset Call button.
- Computer or desk phone: Tap the corresponding Audio button Desk phone only: If you don’t have an HL10 lifter or EHS cable, Press the phone’s Headset button or manually remove the handset when answering a call or hang up the handset when ending a call.
Mute
Mute your headset on an active call:
- Tap the Mute button
- Rotate your microphone boom and click it into the up position
- Take off your headset (requires active smart sensors). Put on your headset to unmute.
Hold a call
To hold an active call or resume a held call:
- Press the headset Call button for 2 seconds.
- Computer or desk phone: Press the corresponding base Audio button for 2 seconds. The button flashes red when a call is on hold.
NOTE: Switching 2 desk phone calls can only be done from your desk phone.
Launch Microsoft Teams (Teams model only)
Your base and headset each have a Teams button to quickly open and use the Microsoft Teams desktop app. The base Teams button illuminates when you have a meeting or notification.
TIP: Your headset’s Call button is also a Teams button.
- When not on a call, tap the Teams button to view Microsoft Teams app on your computer.
- When the base’s Teams button LED pulses purple, tap to join your meeting.
- When the base’s Teams button LED is solid purple, tap to view your Teams notifications.
NOTE: Teams model and Teams desktop application required. Teams mobile application is not supported.
Use sensors
Smart sensors respond when you put on or take off your headset. Customize in Poly Lens App. Below describes default settings.
| With active sensors | putting on the headset will: | taking off the headset will: |
| Mobile/softphone call | answer the call | keep call in headset |
| Music/media | resume music/media (if playing previous to taking off)* | pause music/media (if playing)* |
| Mute (activate in Poly Lens App ) | unmute if on an active call | mute if on an active call |
NOTE *Functionality varies by application. May not function with web-based apps.
Reset sensors
You may need to reset the sensors if they are not working as expected.
There are two ways to reset the headset sensors. Choose:
- With your headset powered on, charge your headset on the charge stand for 10 seconds
- Power on your headset while pressing the Mute
button for more than 4 seconds until the LEDs flash purple 4 times, being careful to not touch the earcup padding or allow it to come in contact with surfaces
Disable sensors
You can disable your headset smart sensors 2 ways:
- Manage sensors in Poly Lens App
- Hold both the Mute
and Call
buttons for more than 4 seconds until the LED flashes purple then red. Repeat to reactivate; the LED flashes purple then blue.
NOTE: Sensors cannot be disabled while streaming audio.
More Features
Play or pause audio
Tap the Call button to pause or resume streaming audio.
Track selection
Double-tap the Call button to skip to the next track or triple-tap the Call button to play the previous track.
Fast forward/rewind
Double-tap and hold the Call button to fast-forward. Triple-tap and hold the Call
button to rewind.
Voice assistant (smartphone feature)
Siri, Google Assistant, Cortana Press and hold the Call button for 2 seconds to activate your smartphone’s default voice assistant. Wait for the phone prompt to activate voice dialing, search, and other smartphone voice controls.
ATTENTION: Voice assistant is only active when your headset is out of base range and paired to a smartphone.
ANC
Active Noise Canceling (ANC) reduces external noise and enhances your music and sound quality.
Slide the ANC switch to choose:
- Low: recommended for office
- High: recommended for loud environments
Change your default line
Change the default outbound phone line/audio channel in Poly Lens App.
Online indicator
Your headset LED illuminates red to inform others that you are on a call. Manage settings in Poly Lens App.
Corded mode (audio over USB)
If your audio is cutting out during softphone calls, you may be experiencing Bluetooth density problems. Improve audio performance by using density-friendly corded mode.
- Disconnect your Bluetooth USB adapter from your computer
- Connect your headset directly to your computer with the provided 1.5 m USB cable
- Power off your headset to use density-friendly corded mode
Troubleshooting
Headset
| I can’t hear a dial tone in the headset. | • Make sure your headset is charged. • Make sure your headset is paired to base. See Pair again to base. • Adjust the configuration switch (A–F) on the bottom of the base until a dial tone is heard. The default A works for most phones. ATTENTION Use configuration D for Cisco phones. Cisco phones connected with EHS cable use configuration A. • Make sure your desk phone is connected correctly to your base. See Desk phone setup details. • If your base is connected to your desk phone’s dedicated headset port, press the desk phone’s headset button to hear a dial tone. • If your base is connected to your desk phone’s dedicated headset port, press the desk phone’s headset button and base’s desk phone button to hear a dial tone. • If your base is connected to your handset port, manually remove the handset to hear a dial tone (if you do not have an EHS cable or HL10 lifter). • Make sure your HL10 lifter is lifting the handset high enough to operate the hookswitch; set to a higher setting if necessary. • Adjust the headset’s listening volume. See Adjust volume. • If the volume is still too low, adjust the desk phone listening volume on the base. See Adjust volume. |
| I hear static. | • Make sure there is at least 12 inches between your base and your computer, and 6 inches between your base and your telephone. If adjusting the distance doesn’t help, your headset is going out of range, move closer to the base. See Position Your Base |
| The sound is distorted. | • Lower the desk phone speaking volume and/or desk phone listening volume on the base. For most telephones the correct setting is position 2. See Adjust volume. • If your desk phone has a volume control, lower until the distortion disappears. • If the distortion is still present, adjust the headset volume control to lower the headset speaker volume. See Adjust volume. • Make sure there is 12 inches between your base and your computer, and 6 inches between your base and your telephone. See Position Your Base. |
| I hear echo in the headset. | • Lower the desk phone speaking volume and/or desk phone listening volume on the base. For most telephones the correct setting is position 2. See Adjust volume. • If the audio level is too low in this position, increase the headset volume. See Adjust volume. • If your speaking volume is too low for your listener in this position, adjust the position of the headset to make sure the microphone is as close as possible to your mouth. |
| People I talk to can hear a buzz in the background. | • Move the base further away from your phone. See Position Your Base. • If the base power supply is plugged into a power strip, plug it into the wall directly |
| I can’t activate Siri or Google Now on my headset. | Your smartphone’s default voice assistant is a mobile-only feature and is not active when your headset is in range of your base. • Ensure that your headset is out of base range • Ensure that the headset is paired to your smartphone • See Voice assistant |
Desk phone
| The handset lifter is installed but does not lift the handset. | • Be sure the handset lifter power cord is firmly pushed into the handset lifter jack on the base. |
Softphone
| When I dial from my softphone application, nothing happens. | • Ensure your headset is charged. • Ensure your headset is paired to the base. See Pair again to base. • Ensure that Poly Lens Desktop App is installed. Download: poly.com/lens. • If Poly Lens Desktop App is not installed and you do not have a compatible softphone, you must first press the base’s Audio button and then use the softphone interface to place/ answer/end calls. • Ensure that the headset is the default sound device by going to your Sound Control Panel (Windows) or your Sound System Preferences (Mac). • Restart your computer. |
| Speaking and/or listening volume is too low or too high. | • Adjust headset listening volume with volume button. • Adjust listening/speaking volumes in the computer’s sound control panel/system preferences. • Adjust listening/speaking volumes in the softphone application. |
| The sound is distorted or I hear an echo in the headset. | • Reduce speaking and/or listening volume on the computer using your softphone application. • Point microphone towards your chin. • If the distortion is still present, lower the volume on the headset. |
| I can no longer hear any audio through my PC Speakers. | For Windows 10 and Windows 8 systems • Go to Start > Control Panel > Sounds and Audio Devices > Audio > Sound Playback and change the default setting from your headset to your PC speakers. Click “OK” to confirm your change. For Windows Vista and Windows 7 systems • Go to Start > Control Panel > Sounds > Playback and change the default setting from your headset to your PC speakers. Click “OK” to confirm your change. For Mac OS X • Choose Apple menu > System Preferences and click Sound. • Click Output, and then select “Internal Speakers” or your speaker choice. |
| (Teams model only) How do I interact with Microsoft Teams? | • Tap the headset Call button or your base’s Teams button to quickly open and use Microsoft Teams. See Launch Microsoft Teams. • Set your target softphone in Poly Lens Desktop App |
| (Teams model only) Does my Microsoft Teams-enabled headset work with other softphones? | Yes, while your headset is optimized for Microsoft Teams, it can be configured to use with other supported softphones. Set your target phone by going to Poly Lens Desktop App. When you configure another softphone, the Call button: • doesn’t interact with Teams • doesn’t go to Teams notifications • will not launch Cortana |
| My audio is cutting out during softphone calls. | • You may be experiencing Bluetooth density problems. Connect your headset directly to your computer. See Corded mode (audio over USB). |
Source
- www.poly.com
- Download User Manual – Download
- Product Page – Click Here
Read More