In this user manual guide, we will review the JVC HA A5T Ear Headphones User Manual. Let’s check this.
JVC HA A5T Ear Headphones User Manual

Specifications
Headphones
BLUETOOTH
| Standard | BLUETOOTH v5.1 |
| Frequency range | 2.402 GHz – 2.480 GHz |
| Output power | Power Class 1 |
| Max. communication distance | Approx. 10 m (33 ft) * |
| Profiles | A2DP/AVRCP/HFP |
| Codecs | SBC |
| Transmission bandwidth | 20 Hz – 20,000 Hz |
| Supported content protection | SCMS-T |
* The communication distance is just an estimate. The sound may be choppy and the communication distance may be shorten depending on the surrounding environment.
Note: This system can register the pairing information of up to 8 BLUETOOTH devices. When the 9th device is paired, the pairing information of the new device will overwrite the information of the oldest registered device.
Power supply/General
| Power supply | Built-in lithium polymer rechargeable battery |
| Battery life | Approx. 5 hours (Depends on usage conditions.)(The charging case can charge the earphones fully up to 2 times (approx. 10 hours).) |
| Charging time | Approx. 2 hours (earphones) Approx. 2.5 hours (charging case) |
| Operating temperature range | 5 °C (41 °F) to 40 °C (104 °F) |
| Charging temperature range | 5 °C (41 °F) to 35 °C (95 °F) |
| Drip-proof performance | IPX4 (earphones) |
| Mass | Approx. 3.9 g (one earphone) / approx. 27.4 g (charging case) (including internal rechargeable battery) |
| Accessories | Charging caseCharging cableEar piece (S, M and L; 2 pcs each) |
Note: Designs and specifications are subject to change without notice.
Charging
Charging the charging case
- When using a commercially available USB conversion AC adapter, make sure to choose one with an output voltage of DC 5 V and output current of 1 A and above. Otherwise, it may result in malfunction or abnormal heating.
- Use only the supplied charging cable to charge the System.
- Using the supplied charging cable, connect the System and a commercially available USB conversion adapter.
1. Connect the charging cable provided to start charging.
- Insert the USB AC adapter into the AC outlet to start charging.
- The indicator lights up, indicating that charging has started.
- The charging time for the charging case is approx. 2.5 hours.
Indicator on the charging case
During charging, the indicator lights up. When charging is complete, the indicator goes out.
Note
- After charging is complete, unplug the USB charging cable.
- The charging case may stop charging if the temperature exceeds the charging temperature range (5 °C (41 °F) to 35 °C (95 °F)). (The indicator on the charging case will flash quickly for 2 times.) Charging will resume automatically in an environment where the temperature is back within the charging temperature range.
- To prevent deterioration of the battery, charge the charging case once every 6 months when it has not been used for a long period of time.
- When charging the charging case that has not been used for a long period of time, it might take some time for the indicator to light up or flash. Wait for the indicator to light up or flash.
Charging the earphones
- Open the charging case.
- Before charging, peel off the insulation film.
- Insert the L and R earphones correctly and firmly into the charging case.
- During charging, the indicators on the earphones light up. The indicator on the charging case will light up or flash for a few seconds. When the indicator on the charging case does not light up or flash, remaining battery of the charging case is low. Charge the charging case. Charging the charging case
- When charging is complete, the indicators on the earphones will turn off.
- The charging time for the earphones is approx. 2 hours.
Note
- After the earphones are inserted into the charging case, the power of the earphones will automatically turn off.
- When the charging case runs out of battery while the earphones are charging, the earphones are turned on. In this case, turn the earphones off manually. Powering off using the earphones
- When the charging case is fully charged, it can be used to recharge the earphones fully up to 2 times.
- The earphones may stop charging if the temperature exceeds the charging temperature range (5 °C (41 °F) to 35 °C (95 °F)). (The indicators will flash quickly for two times.) Charging will resume automatically in an environment where the temperature is back within the charging temperature range.
- Depending on the BLUETOOTH device connected, the remaining battery power of the earphones will be displayed but this may not be accurate. Use it as a guide.
- To prevent deterioration of the battery, charge the earphones once every 6 months when the earphones have not been used for a long period of time.
- When charging the earphones that have not been used for a long period of time, it might take some time for the indicators to light up. Wait for the indicators to light up.
Maintaining the charging terminals
When the charging terminals are dirty or dusty, it may affect the charging performance. Gently wipe the charging terminals regularly with cotton swab.
Connecting (Power On)
It is necessary to pair (device registration) the System with your BLUETOOTH device before using the System to listen to music and make a call.
Pairing (Registering a device)
The method of operation varies depending on the connection.
Pairing for the First Time
Pairing with the earphones taken out from the charging case.
- Take out both the L (left) and R (right) earphones.
- After the earphones are taken out, the L (left) and R (right) indicators flash, and the power turns on automatically.
- When the L and R earphones are connected with each other, the R indicator starts to flash every 5 seconds.
- After a short while, the L indicator starts to flash quickly and repeatedly, and a voice message saying “Pairing” can be heard.
Note
When there is an interval between the timing when the L and R earphones are taken out from the charging case, connection between them may fail. In this case, put the earphones back into the charging case, wait till their power goes off and repeat the steps again.
2. Turn on the Bluetooth function of the BLUETOOTH device.
3. Select “JVC HA-A5T” from the device list.
- After connection is established, both the L and R indicators will flash every 5 seconds, and the earphones can now be used for listening to music.
Note
- During the pairing process, the BLUETOOTH device may require input of a PIN code. In such a case, enter “0000” as the PIN code for the System.
- If connection (pairing) is not completed within 5 minutes after the indicator starts flashing, the System automatically turns itself off.
Pairing earphones when they are not inside the charging case.
- Press and hold the button on the L (left) and R (right) earphones for about 3 seconds.
- The power of the L and R earphones turns on. When the L indicator starts to flash quickly and repeatedly (or when a voice message saying “Pairing” is heard), release your fingers from the buttons.
- Turn on the Bluetooth function of the BLUETOOTH device.
- Select “JVC HA-A5T” from the device list.
- After connection is established, both the L and R indicators will flash every 5 seconds, and the earphones can now be used for listening to music.
Note
- During the pairing process, the BLUETOOTH device may require input of a PIN code. In such a case, enter “0000” as the PIN code for the System.
- If connection (pairing) is not completed within 5 minutes after the indicator starts flashing, the System automatically turns itself off.
Pairing the Second and Subsequent Devices
Pairing with the earphones taken out from the charging case.
- Turn off the Bluetooth function of the device that was last paired.
- Take out both the L (left) and R (right) earphones.
- After the earphones are taken out, the L and R indicators will flash, and the power turns on automatically.
- When the L and R earphones are connected with each other, the R indicator starts to flash every 5 seconds.
- After a short while, the L indicator starts to flash quickly and repeatedly, and a voice message saying “Pairing” can be heard.
3. Turn on the Bluetooth function of the BLUETOOTH device.
4. Select “JVC HA-A5T” from the device list.
- After connection is established, both the L and R indicators will flash every 5 seconds, and the earphones can now be used for listening to music.
Note
- During the pairing process, the BLUETOOTH device may require input of a PIN code. In such a case, enter “0000” as the PIN code for the System.
- If connection (pairing) is not completed within 5 minutes after the indicator starts flashing, the System automatically turns itself off.
Pairing earphones when they are not inside the charging case.
- Turn off the Bluetooth function of the device that was last paired.
- With the power of the earphones turned off, press and hold the button on the L (left) earphone for about 5 seconds.
- When the power of the L earphone turns on and the L indicator starts to flash quickly and repeatedly (or when a voice message saying “Pairing” is heard), release your finger from the button.
- Turn on the Bluetooth function of the BLUETOOTH device.
- Select “JVC HA-A5T” from the device list.
- Press and hold the button on the R (right) earphone for about 3 seconds. Release your finger after the R indicator lights up. The R earphone turns on and gets connected to the L earphone.
- After connection is established, the R indicator will flash every 5 seconds, and the earphones can now be used for listening to music.
Reconnect
Connecting to a device with the earphones taken out from the charging case.
Turn on the Bluetooth function on the device to connect, followed by taking both earphones from the charging case. The power of the earphones turns on automatically, and they are automatically reconnected with the last connected device.
Note
- If reconnection cannot be established, operate the BLUETOOTH device to connect.
- If connection is not established for more than 5 minutes, the power of the earphones automatically turn off.
Connecting to a device when the earphones are not inside the charging case.
- Check that the power of the earphones is off. Power Off
- Turn on the BLUETOOTH function of the device to connect, followed by pressing and holding the button on the L and R earphones at the same time for about 3 seconds.
Left
- The indicator flashes and the power turns on.
- The System then automatically attempts to connect with the last connected device.
- After connection is established, the L indicator continues to flash every 5 seconds.
Right
- The indicator flashes and the power turns on.
- It will attempt to connect with the L earphone.
- After connection is established, the R indicator flashes twice and switches to flash every 5 seconds.
- The earphones reconnect with the device that was last connected and can now be used for listening to music.
Note
- If reconnection cannot be established, operate the BLUETOOTH device to connect.
- If the R indicator only flashes twice, this means the L and R earphones are not connected to each other. In this case, turn off the power of both the L and R earphones, followed by turning on their power again at the same time.
- Pressing and holding the button of the L earphone for about 5 seconds switches the L indicator light to a quick flash. If this occurs, turn off the power of the earphone and repeat the steps from the beginning. Power Off
- If connection is not established for more than 5 minutes, the power of the earphones automatically turn off.
Using only L side of the earphones
After the Bluetooth function of the device to connect is turned on, the L earphone can now be used on its own.
- Take out the L earphone from the charging case. The power of the earphones turns on automatically, and they are automatically reconnected with the last connected device.
Note
- To use only the L earphone when it is not inside the charging case, press the button of the L earphone for about 3 seconds to turn on the power.
- If pairing has not been performed, do so before using. Pairing (Registering a device)
- To use both sides of the earphones, take out the R earphone from the charging case.
- Note that the R earphone cannot be used on its own.
Audio / Phone
After the Bluetooth connection is established, the System can be used for listening to music and hands-free calling.
Audio operation
Wearing
- Identify the L and R sides of the earphones and put them on correctly.
- There is a semicircle raised bump on the L (left) side.
- Adjust the position of the earphones to fit them into your ears.
- Incorrect ear piece size can result in sound leakage and lack of bass.
- The medium-size silicone ear pieces are attached when purchased.
- Choose an appropriate ear piece from the three sizes (S, M and L) to enhance your listening experience and for the best fit.
- If the ear piece is not securely attached, it may slipped off when in use and remain in your ear. If the ear piece remains in your ear, be careful not to push it further into your ear.
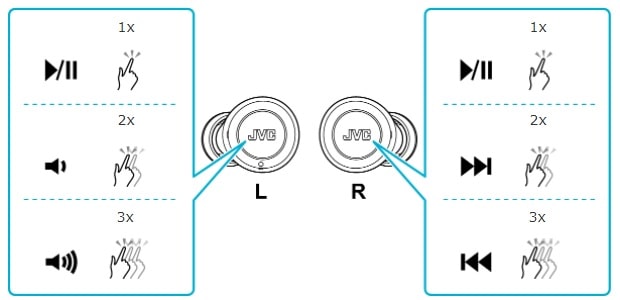
Operating the remote control
Launch the music player app on the BLUETOOTH device connected, to start playback.
| Play/Pause | Press the button on L or R earphone once quickly. |
| Volume adjustment | To lower the volume, press the button on the L earphone twice quickly. To raise the volume, press the button on the L earphone 3 times quickly. |
| Skip to the next track | Press the button on the R earphone twice quickly during playback. The next track will be played. |
| Skip to the previous track or beginning of the current track | Press the button on the R earphone 3 times quickly during playback. The previous track or beginning of the current track will be played. |
Note
- When the remaining battery power becomes low, a beep is heard repeatedly from the earphone that had ran out of battery.
- When watching movies with the earphones, a slight time lag may occur in the audio output.
- We do not guarantee all operations of the BLUETOOTH device.
Phone operation
Operating the remote control
Identify the L and R sides of the earphones and put them on correctly. Wearing
The same operation can be performed by pressing either the L or R button (except the volume adjustment and voice recognition operation function).
| Answering the call | Press the button once quickly when receiving a call. |
| Ending the call | Press the button once quickly during the call. |
| Rejecting a call | When there is an incoming call, press continuously for about 1 second until a beep is heard. Once the beep is heard, release your finger. |
| Switching between the earphones and the smartphone during a call | During a call, press continuously for about 1 second until a beep is heard. Once the beep is heard, release your finger. |
| Using voice assistant function (Siri etc) | When you are not using the phone function, press L button for about 1 second until a beep is heard. Once the beep is heard, release your finger. |
Note: The System cannot guarantee operation of all of the remote control functions.
Power Off
Powering off by placing earphones in the charging case.
After using the earphones, place them back into the charging case. The power of the earphones will turn off and charging will start automatically.
- The earphones start charging. Charging
Note
If the battery power of the charging case has run out, the power of the earphones will not turn off automatically even when they are placed back into the charging case. When this occurs, charge the charging case. Charging the charging case.
Powering off using the earphones
Press the button on the L or R earphone continuously for about 3 seconds.
- Release your finger after the indicator lights up. The indicator light goes off and the power turns off.
- When the power for the L or R earphone is turned off, the other side will automatically power off.
Troubleshooting
Main Unit
| Symptom | Action |
|---|---|
| Unable to pair | Place both earphones into the charging case, wait for the indicator light to turn off or on, followed by taking out both earphones again at the same time. When pairing, make sure the BLUETOOTH device is within 1 m of the System. Operate the BLUETOOTH device to connect. Turn on the BLUETOOTH device and enable pairing. Delete the pairing information on the BLUETOOTH device list and perform pairing again. Perform operations after setting the BLUETOOTH function of the connected device to OFF and then to ON again. Perform operations after turning off the connected device and on again. Refer to the steps to establish a connection. Pairing (Registering a device) Check whether the System is connected to another device. Turn off the BLUETOOTH settings of other devices and enable pairing with the desired device. |
| The L earphone flashes quickly or twice repeatedly and connection cannot be established | Turn on the BLUETOOTH device, enable its Bluetooth function and select the System from the BLUETOOTH device list. |
| Sound is heard only from the left or right earphone | Place both earphones into the charging case, wait for the indicator light to turn off or on, followed by taking out both earphones again at the same time to connect. After taking out the earphones, move the L and R earphones close to each other. Insert the ear pieces more securely. Reset the setting to factory default and connect again. Restoring the settings to the initial state |
| The R earphone flashes twice repeatedly and no audio sound is output | Place both earphones into the charging case, wait for the indicator light to turn off or on, followed by taking out both earphones again at the same time to connect. After taking out the earphones, move the L and R earphones close to each other. |
| After connecting to the System, the BLUETOOTH device connected does not function immediately | Depending on the BLUETOOTH device connected, even when the L indicator lights up after connecting to the System, the BLUETOOTH device may not function immediately due to the time lag in the connection operation. Wait for a few seconds and try operating again. |
| The volume is low or the sound is unpleasant | Increase the volume on the System or the BLUETOOTH device connected. Insert the ear pieces more securely. Change the size of the ear pieces. Audio operation |
| Unable to skip back to the previous track | During playback tap the button on the R earphone 3 times quickly. The previous track or beginning of the current track will be played. |
| Unable to skip to the next track | During playback tap the button on the R earphone 2 times quickly. The next track will be played. |
| The earphones fall off the ears easily | Change the size of the ear pieces. Audio operation |
| The sound is distorted | Adjust the volume on the BLUETOOTH device connected so that there is no distortion, and then adjust the volume on the System. Charge the main unit. Charging |
| Ring tone is soft and cannot be heard | The ring tone may not be heard from the earphone if the silent mode of the BLUETOOTH device is turned on. Turn off the silent mode of the BLUETOOTH device or adjust the volume of the ring tone. |
| The sound is choppy and there is noise | Use the connected device in a position or orientation that allows for the most stable communication. The sound tends to be interrupted when the headphones are covered with the hands. Try reducing the number of apps running on the BLUETOOTH device connected. Charge the main unit. Charging |
| The System does not work correctly | Re-charge the system and switch power on. |
| Unable to turn on the power | Charge the charging case first. Charging the charging case Charge the main unit. Charging |
| Unable to charge and turn off the power (earphones) | Remove both earphones from the charging case and place them back in again. Make sure that the earphones are fully inserted into the charging case. Use a cotton swab to remove any dirt from the contacts of the earphones and charging case. Charge the charging case first. Charging the charging case |
| Unable to charge (charging case) | Make sure that the USB cable is plugged in all the way. Please charge within the charging temperature range (5 °C (41 °F) to 35 °C (95 °F)). |
| The earphones are turned on during charging | When the charging case runs out of battery, the earphones are turned on. In this case, turn the earphones off manually. Powering off using the earphonesCharge the charging case. Charging the charging case |
| Unsure what the flashing and lighting up of the indicators indicate | Refer to Indicator status list. |
| Music or voice calls cannot be heard | Delete the pairing information on the BLUETOOTH device list. Perform pairing after turning off the connected device and on again (or after rebooting). |
If no sound is heard from the earphones or the earphones cannot be connected to your BLUETOOTH device after performing the operations suggested in the Troubleshooting section, restoring the settings of earphones to the initial state may solve the problem. Restoring the settings to the initial state
Restoring the settings to the initial state
If no sound is heard from one side of the earphones or the earphones cannot be connected to your BLUETOOTH device, restoring the settings of earphones to the initial state may solve the problem.
Information of all the paired devices will be deleted (initialized). Perform pairing again from the start.
- Start by deleting the registration information of this unit from the BLUETOOTH setting on the BLUETOOTH device.
1. Insert the L (left) and R (right) earphones into the charging case.
2. Wait for a few seconds and check that charging has started.
- During charging, the indicators on the earphones light up.
3. Press and hold the button on the L earphone for about 15 seconds. After pressing and holding for 10 seconds, the indicator on the earphone flashes once. Continue to press for another 5 seconds until the indicator flashes once again, then release your finger.
4. Press and hold the button on the R earphone for about 15 seconds. After pressing and holding for 10 seconds, the indicator on the earphone flashes once. Continue to press for another 5 seconds until the indicator flashes once again, then release your finger.
- Check that indicators on both earphones are turned off before performing the next operation.
5. Remove both earphones from the charging case and place them back in again.
- The L and R indicators light up and charging begins.
6. Take out both earphones from the charging case.
- The L and R indicators light up for 1 second and the power turns on.
7. After a while, the L and R earphones are connected to each other and the R indicator starts to flash slowly (once every 5 seconds). Then the L indicator starts to flash quickly and repeatedly.
- The settings are restored to the initial state (factory default).
- When the L indicator flashes quickly, the earphones are now ready for device pairing. Pair the earphones with a device. Pairing (Registering a device)
Note
- Ensure that the L and R earphones are close to each other when restoring the earphones to the initial state.
- If you release your finger from the button when the indicator flashes for the first time, settings will not be restored to the initial state completely. Only the paired device information is deleted.
- If the L and R earphones cannot be connected, press the button on the earphones again to turn off the power and repeat the operation from the start.
Indicator status list
| Earphone status | Status | Action | |
|---|---|---|---|
| L | R | ||
| Lights up | Lights up | Charging in progress (while inserted in the charging case) | – |
| Light goes out | Light goes out | Charging completed (while inserted in the charging case) | – |
| Flashes quickly | – | Waiting for pairing | Turn on the BLUETOOTH function on the BLUETOOTH device, select this unit from the device list. If connection cannot be established, delete the pairing information on the BLUETOOTH device and perform pairing again.Pairing (Registering a device) |
| Flashes twice | – | Waiting to connect to device (unable to find the device that was last paired) | Turn on the BLUETOOTH function on the BLUETOOTH device, select this unit from the device list.Reconnect |
| – | Flashes twice | Unable to connect the L and R earphones | Place the L and R earphones into the charging case, then take them out at the same time. |
| Flashes every 5 seconds | Flashes every 5 seconds | L and R earphones are properly connected to the BLUETOOTH device | – |
| Flashes slowly | Flashes slowly | L and R earphones pairing in progress | The L and R earphones will be automatically connected. The indicator on the L earphone will flash quickly while waiting for pairing. |
Note
The BLUETOOTH device is connected to the L earphone. The L earphone is the master unit and it connects the R earphone.
License
- The Bluetooth word mark and logos are registered trademarks owned by Bluetooth SIG, Inc. and any use of such marks by JVCKENWOOD Corporation is under license. Other trademarks and trade names are those of their respective owners.
- Siri is a trademark of Apple Inc., registered in the U.S. and other countries.
- Other company names and product names in this manual are trademarks of the respective companies and registered trademarks in other countries.
Source
- jvc.com
- Download User Manual – Download
- Product Page – Click Here
Read More